
One week to go and it’s Labor Day – the unofficial end to summer and the Backyard Party Season. Labor Day is an American celebration of the workforce. The very first Labor Day Parade took place on a Tuesday, September 5, 1882. It was the brain-child of Peter J. McGuire, a carpenter and labor union leader. Mr. McGuire felt the span between Independence Day and Thanksgiving was far too long, and the workers deserved a holiday all their own somewhere in between. His inspiration came from America’s northern neighbor, Canada. In 1887, Oregon became the first state to declare Labor Day as a public holiday. By 1894, Congress had unanimously voted to approve legislation to make Labor Day a National Holiday, moving the date to the first Monday in September.
All I know is that Labor Day is one of my all-time favorite National Holidays. Who doesn’t love a three-day weekend? It’s a last hora for the barbecue/picnic season, and it means Autumn isn’t far off – my favorite time of the year in the kitchen.
While I’m not sure just where we will be this Labor Day, my menu is planned and I’m excited to get cooking! First up, this year’s menu. Those of you who have read my blogs of the past know that one of my favorite things to do is to create menus. There’s something wonderful about the thought and reflection that goes into a set menu. Sometimes I fear the meal planning task is a lost art for the homemaker of today. So busy with work, the children and running Mom’s Taxi Service, meals are often last-minute decisions.
Appetizers and Munchies:
Red, White & Blue Deviled Eggs
Roast Beef Spirals with Cream Cheese-Horseradish Spread
Store-Bought Chips, Dips and Assorted Munchies
Main Goodies:
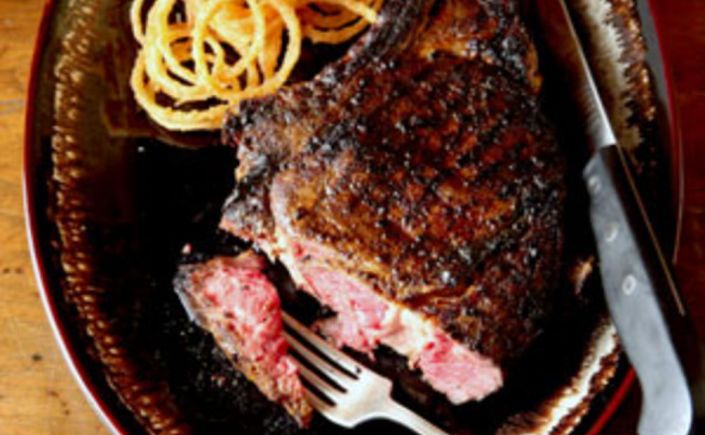
Grilled New Mexican Marinated Flank Steak
Spice-Rubbed Picnic Chicken in Sourdough Bread Bowls
Hot Dogs & Hamburgers
Side Dishes:
Butterfly Pesto Pasta Salad
Mema’s Potato Salad
Watergate Jello Salad
Sliced Mellons such as Cantaloupe and Honey Dew
Sweet Delights:
Shirley Temple Bundt Cake
Platter of cookies or store-bought mini cupcakes

For The Eggs
16 Hard Boiled Eggs (or as needed, see tip below)
1 Cup Mayonnaise
3 Teaspoons Dijon Mustard (or your favorite style)
4 Tablespoons red wine vinegar
Onion powder to taste
Garlic Powder to taste
Kosher Salt and White Pepper to taste
Tip: Boil 2 or 3 eggs more than required to fill serving tray. The extra eggs give more yolk filling, the extra whites allow for tasting and adjusting seasonings if necessary.
To Boil eggs, place eggs in a pan and cover with cold water. Bring to a full boil. Remove from heat, cover and let rest for 12-14 minutes. Drain, then plunge eggs into ice-cold water to cease the cooking process. The results will be a perfectly cooked egg with a sunny yellow yolk.
Tips for Peeling Hard-Boiled Eggs: Once eggs are cool enough to handle, roll gently on counter to crack shells. Place into cold water, refrigerate for 30 minutes to 1 hour. Remove from water and peel. Water will work its way into shell, the result is an easily peeled egg. Farm Fresh eggs are difficult to peel. Try to buy your eggs at least a week in advance.
Peel eggs and cut in half lengthwise. Remove egg yolks and place yolks in food processor with mixing/chopping blade. Set whites aside and mix coloring.
For The Coloring
2 or 3 teaspoon Royal Blue Food Coloring (more if needed)
2 or 3 teaspoon Red Food Coloring (more if needed)
2 tablespoons white vinegar, divide
In a glass bowl, mix 1 cup hot water, distilled white vinegar and Royal Blue Food Coloring. Mix well and add more coloring if desired. In another glass bowl, mix remaining cup of hot water, distilled white vinegar and Red Food Coloring. Mix well, and add more coloring if desired. Set coloring bowls aside until ready to color.
Mix/chop yolks until fluffy and are fine grade resembling bread crumbs. Add mayonnaise and mustard and mix until creamy. Mix in red wine vinegar one tablespoon at a time and season to taste. Transfer yolk mixture to a bowl and chill until ready to fill.
Divide egg white halves into three groups. One group is to remain uncolored, the remaining two are colored red and blue.
Color one-third of the egg whites, one at a time, in the blue mixture. Allow egg white to soak undisturbed for about 3 or 4 minutes. Turn gently to allow other side to soak.. Once desired color is reached, remove dyed white from coloring. Lay on a paper-towel lined baking sheet cut side down and let drain/dry. Repeat until a third of the egg whites have been colored blue.
Color another third of the egg whites in red coloring as above.
To assemble: Place 12 white halves on serving dish or egg platter. Select best of the halves.
Spoon filling mixture into a piping bag fitted with desired tip. (I like the larger star for deviled eggs), then pipe into egg white halves.
Tent with plastic wrap (using toothpicks for “tent) and refrigerate until ready to serve.
************

1 (8 ounce) package cream cheese, at room temperature
2 green onions, chopped about 1/2 cup
1⁄4 cup chopped fresh parsley
2 tablespoons prepared horseradish, drained
1⁄4 teaspoon salt
1⁄4 teaspoon garlic powder
8 ounces deli roast beef, sliced
2 10-inch flour tortillas, (flavored add a nice touch)
Combine cream cheese, green onions, parsley, horseradish, salt and garlic powder. Blend until smooth.
Place the two tortillas on work surface, spread half of cheese over each, top each with half of the roast beef slices, leaving a 1/2 inch border around edges.
Roll up, wrap tightly in plastic wrap.
Refrigerate until firm, 30 minutes or up to 1 day ahead. Remove from refrigerator, unwrap and cut diagonally into 1/2 inch slices. Arrange cut-side up on serving tray.
Note: For a red, white and blue presentation, add a little blue food coloring to the cream cheese mixture and use white flour tortillas.

For the Steak
2 to 2 1/2 pound flank steak
Place flank steak in a large casserole dish, allowing steak to lay flat. Set aside while marinade is made.
For the New Mexican Marinade
2 tablespoons of extra-virgin olive oil
1/2 cup soy sauce
1/3 cup apple cider vinegar
1 1/2 teaspoons Mexican Oregano, crushed between your palms
1 teaspoon onion powder
1 teaspoon garlic powder
1 teaspoon Ancho chile powder
1 teaspoon freshly ground black pepper
1 teaspoon salt
1 teaspoon powdered cumin seed
Juice from 2 limes
4 to 5 cloves minced garlic
In a medium-size bowl, combine all the ingredients. Whisking to blend well.
Pour marinade over steak. Cover, refrigerate, and let marinate overnight or at least 8 to 10 hours, turning several times.
When ready to cook, remove from refrigerator 30 minutes prior to grilling. Prepare and pre-heat your grill for cooking. Grill the marinated steak 5 to 7 minutes per side, is medium rare or until the internal temperature reaches desired temperature on your meat thermometer. Flank steak is best when grilled rare or medium rare. Overcooking will result in a tough, dried out hunk of meat.
Remove from heat and let steak rest 5 minutes before slicing. With a sharp knife, slice steak thinly against (diagonal) the grain.
************
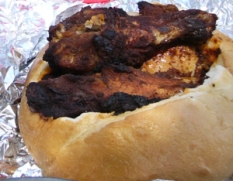 Spice-Rubbed Picnic Chicken in Sourdough Bread
For The Rub:
6 Tablespoons Brown Sugar
¼ Cup Kosher Salt (reduce by half if using table salt)
¼ Cup Chili Powder
½ Cup Paprika
4 Teaspoons Black or White Pepper
½-¾ Teaspoon Cayenne Pepper (increase for spicier flavor)
For The Chicken & Everything Else
2 bone-in Split Chicken Breasts, trimmed, skin slashed, cut in half
4 Bone-in Chicken Thighs, trimmed and skin slashed
4 bone-in Chicken drumsticks, trimmed and skin slashed
2 Large or 4 Small Bread Bowls, hollowed out (save bread)
2 Large or 4 small sheets of foil (to wrap the chicken-filled bowls)
Line 2 rimmed baking sheets with foil and top with wire racks. Set aside.
Combine sugar, salt, chili powder, paprika, pepper and cayenne in a small bowl. Coat chicken pieces with spice mixture, gently lifting skin to distribute spices underneath while leaving skin attached to chicken. Place chicken skin-side up on prepared wire racks, tent with foil and refrigerate for at least 8 hours, up to 24 hours for best flavors.
Adjust oven racks upper-middle and lower-middle positions and heat oven to 475-degrees.
Remove foil covering from chicken and roast until brown, crisp and breasts register 160-degrees. Roast chicken for 20 minutes. Switch and rotate baking sheets, continue to roast 15 minutes longer.
Transfer breast pieces to a platter or dish, cover to keep warm. Continue to roast thighs and drumsticks until they register 175-degrees, about 10-15 minutes longer. Turn off oven. Place an assortment of chicken pieces inside each bowl. Top with bread “lid”. Wrap tightly in foil and keep in the warm oven until ready to place on the table, no more than an hour to prevent everything from drying out. Once removed from oven, keep everything wrapped in foil until ready to serve. Bread will absorb some of the chicken flavoring while keeping the chicken warm.
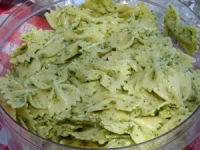 Butterfly Pesto Pasta Salad
3 Garlic Cloves, unpeeled
1 Cup Fresh Basil
1 ½ Cups Baby Spinach
¼ Cups Pine Nuts
¼ Cup Olive Oil
3 Tablespoons Lemon Juice
1 Tablespoon Red Wine Vinegar
Salt & Pepper
¼ Cup Parmesan Cheese
½ Cup Best Foods Mayonnaise
1 lb Farfalle Pasta (bow-tie)
1/4 Cup or so Reserved cooking water
Toast garlic in a small skillet over medium-heat, shaking pan occasionally, until fragrant and color deepens slightly, about 7 minutes. Let garlic cool, then peel and chop coarse.
Process garlic, basil, spinach, pine nuts, olive oil, lemon juice, salt and pepper in food processor until smooth, stopping to scrape down bowl as needed. Add Parmesan Cheese and mayonnaise, continue to process until thoroughly combined. Transfer pesto to a small bowl, cover and refrigerate until needed. (Mixture can be refrigerated for up to 24 hours).
Bring a large pot of salted water to a rapid boil. Add pasta and cook, stirring often, until pasta is just past al dente. Reserve ¼ cup of pasta cooking water, drain pasta. Toss pasta with a little olive oil and spread into a single layer on rimmed baking sheet. Let pasta cool to room temperature, about 30 minutes.
In a large bowl, toss cooled pasta with pesto, adding reserved pasta water, 1 tablespoon at a time, until pesto evenly coasts pasta.
************
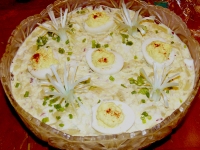 Mema’s Potato Salad
3 lbs Yukon Gold Potatoes
4 Eggs, hard-boiled
1 Red Onion, minced
2 Celery Stocks, minced
1 Tablespoon Bacon Drippings, warm (Optional)
1 Cup Mayonnaise
1/4 Cup Sour Cream
1 Tablespoons Mustard
2 Tablespoons Red Wine Vinegar plus a sprinkling for potatoes
Kosher Salt & Fresh Black Pepper to taste
¼ Cup Parsley or green onion for garnish
Peel and slice potatoes into large chunks. Place potatoes in a stockpot and cover with 1-inch of salted water. Bring to a boil, reduce heat to medium-low and simmer until potatoes are just tender but not soft, about 10-15 minutes. Drain well. Sprinkle LIGHTLY with red wine vinegar and set aside in refrigerator to cool.
Place eggs in a saucepan, add cold water to cover eggs. Bring to a boil, remove from heat and cover. Let sit for 12-14 minutes, then plunge eggs into cold water to stop cooking process. Once cooled, roll egg on counter to crack the shell. Return eggs to cold water and let sit for about 15 minutes. This will help to make the eggs easier to peel.
Meanwhile, in a large bowl combine onions, celery, bacon drippings, mayonnaise, mustard, sour cream and red wine vinegar. Whisk to combine. Taste dressing and season with kosher salt and fresh ground black pepper to taste.
Peel and chop 3 eggs. Add to dressing. Cut V marks in 4th egg to create two tulip flowers. Reserve 1 flower, chop other and add to dressing. Taste dressing a second time, adjust seasonings as necessary.
Place potatoes in a large bowl. Pour egg dressing over potatoes and toss to coat. Smooth out top. In the center, using the back of a spoon, create a small indentation. Place Egg flower into indentation. Sprinkle top of salad with parsley or chopped green onion for added color. If desired, sprinkle lightly with paprika. Cover with plastic and refrigerate until well chilled.
************
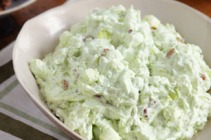 Watergate Salad
8 oz Cool Whip
1 Box Pistachio Pudding Mix (low-fat)
16 oz Crushed Pineapple with juice
1 Cup Mini-Marshmallows
1/2 Cup Chopped Pecans, optional
Fold pudding mix into cool whip until well incorporated.
Add remaining ingredients.
Cover and refrigerate until well chilled, at least an hour.
Note: To add a little more color, try using colored mini-marshmallows or garnish with maraschino cherries or both!
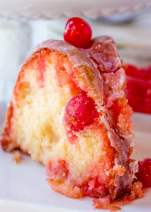 Shirley Temple Cake
The Bundt Cake
1 1/2 cups butter softened
3 cups granulated sugar
5 large eggs
3 cups all-purpose flour
2 Tablespoons lemon extract
3/4 cup 7-Up
1 jar maraschino cherries 10 oz, drained and juice reserved
Pre-heat oven to 325.
In large bowl mix together the butter and sugar until light and fluffy.
Add in the eggs and continue to mix until blended. Next add the flour and mix again until smooth. Add the lemon extract and 7-Up. Beat lightly to combine.
Gently fold the cherries into the batter. Set aside until ready to bake.
Grease a bundt pan with shortening, then dust it with flour.
Spread the batter into the prepared pan. Bake for 1 1/2 hours or until center is set.
Allow the cake to cool in the pan for 10 minutes. Remember, the cake will continue to cook while in the pan.
Turn the cake out on a cooling rack, then turn again so that it is right side up. Place the cake while still warm onto a serving dish.
Using a skewer, poke holes all over the top of the cake. Slowly pour the reserved cherry juice over the cake and let it all soak in. Don’t worry if the juice soaks all the way to the bottom. It will be fine. Let the cake cool completely. While cake cools, make the glaze.
The Glaze
2 cups powdered sugar
1 Tablespoon lemon extract
3-4 Tablespoons milk
In a bowl, mix together the powdered sugar and lemon extract. Add milk, one tablespoon at a time, until desired consistency is reached.
Once cake is cooled, drizzle with glaze. Garnish with cherries and serve.
Wishing you and your family a wonderful, fun-filled Labor Day! If you are looking for more Labor Day recipes, check out a few suggestions from the past:
Labor Day Picnic – A Fond Farewell To Summer
****** The Menu ******
The Main Dishes
Grilled Onion Hamburgers
Bratwurst in Beer – Picnic Style
Italian Muffuletta Picnic Sandwich
The Side Dishes
Cooler Corn on the Cob
Mema’s Potato Salad
The Salads
Asparagus and Tomato Salad with a Honey-Balsamic Vinaigrette
Red Potato Salad*
Tropical Pineapple-Lime Jello Salad
The Sweet Dessert:
Peach-Almond Upside Down Cake
****** The Menu ******
The Grilled Meats
Grilled Smoked Sausage with Barbecue Sauce
Boozy Bacon Bourbon Barbecue Chicken Kabobos
Grilled Flat Iron Steak with Chimichurri Sauce
Hot Dogs or Hamburgers for the Children
The Side Dishes
Roasted Rosemary Potatoes
Slow Cooker Smokehouse Bacon Beans
Warm French Bread with Melted Garlic Butter
The Salads
Asparagus and Tomato Salad with a Honey-Balsamic Vinaigrette
Red Potato Salad
Tropical Pineapple-Lime Jello Salad
The Refreshing Ends
Lemon Pie Squares
Sugar Cookie Fruit Pizza
If nothing else, I hope you come away with some inspiration and create your own Labor Day celebration that is perfect for your family and friends.
")
")
")
")
")
")
")